IDEs and workflows
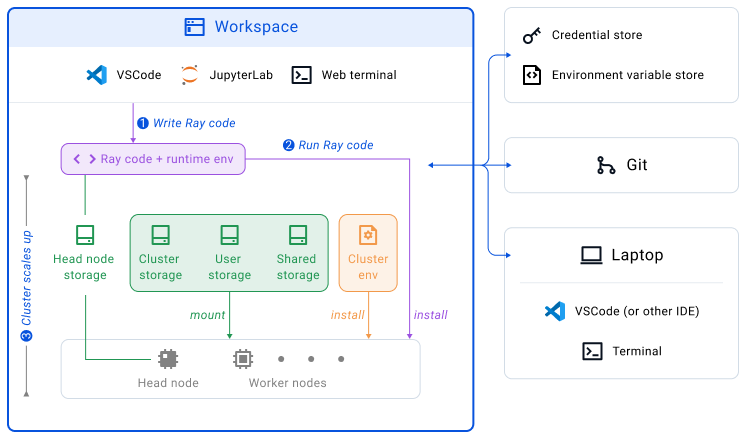
ML practitioners can develop Ray applications using familiar IDEs like Visual Studio Code (VS Code), JupyterLab Notebook or Web Terminal. Workspace has a Ray cluster attached and the code files and git states are persisted in your cloud provider account.
Three types of workflows
Depends on your preference, you can choose how Workspace best fits into your existing workflows.
1. Cloud-centric workflow
- Hosted VS Code
- Hosted JupyterLab Notebooks
- Web Terminal
2. Laptop-centric workflow
- Local VS Code connected to the remote Workspace
- Workspace CLI Commands
3. Hybrid of 1 and 2
Cloud-centric workflow
The cloud-centric workflow is great for users who don't want to manage a local development environment.
Hosted VS Code
You can start working on your code with the hosted VS Code. Click on the VS Code icon to open the hosted VS Code.

Note: Hosted VS Code service does not work on Firefox. This is due to the "Total Cookie Protection" enabled by default. Make sure to disable that to use it in the browser.
Hosted JupyterLab Notebooks
You can start experimenting with ML models in JupyterLab notebooks by selecting the JupyterLab icon on the top menu.

JupyterLab notebooks that you use in the Head node storage will be automatically persisted as part of the Workspace files.
Note: Hosted JupyterLab service does not work on Firefox. This is due to the "Total Cookie Protection" enabled by default. Make sure to disable that to use it in the browser.
Web Terminal
Web Terminal is available on the UI when the Workspace is active. It's a great way to interact with the underlying cluster just like your local terminal.
Customize your Web Terminal
If you want a custom .bashrc, create a file ~/.workspacerc and add your contents into it. Workspaces will source ~/.workspacerc in its .bashrc. The file .workspacerc is symlinked into /mnt/user_storage so it is persisted for you across all your Workspaces. ~/.gitconfig is persisted in this way as well.
Warning: be careful when editing your .workspacerc since you can pollute Workspaces with invalid commands.
Laptop-centric workflow
The laptop-centric workflow is great if you already have your favorite development tools setup locally, and just want to use them to develop code on the Anyscale platform.
Local VS Code - remote experience
Instead of using VS Code in a browser, you can use your local VS Code and - through remote experience - access and program your Anyscale cluster. You have two options to start a new session on your local VS Code.
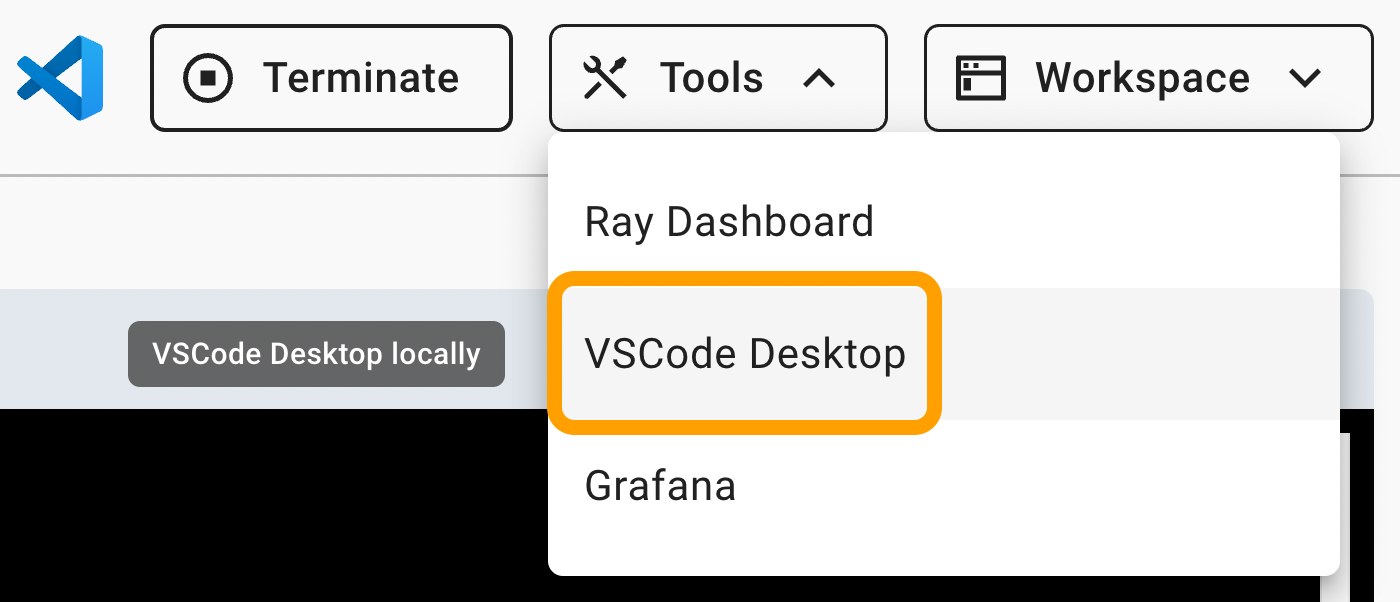
Option 1: under Tools menu, select VS Code Desktop:
Option 2: open VSCode hosted (the web version), open command palette ("CMD + P"), then type > anyscale, and select "Open in VSCode Desktop":

Workspace CLI Commands
If you prefer an IDE other than VSCode (for example, PyCharm, Vim), you can use them to write code locally and leverage the anyscale workspace group of CLI commands to execute the code remotely. You don't need to manage two separate runtime environments (local vs remote) because all the code execution happens on the Anyscale cluster.
-
After you have created a Workspace through the Anyscale UI, clone it with the following command. Note the Workspace cluster must be RUNNING for these commands to be used:
anyscale workspace clone -n <name> -
From within a locally cloned Workspace directory:
anyscale workspace run 'python main.py' [--no-push] [--as-job]
anyscale workspace run will run the command remotely on the Workspace cluster instead of on your local laptop. It will automatically push files prior to running so there is no need to push explicitly beforehand. You do not need to install any dependencies locally because the execution of the command runs remotely on the cluster container. When run as an Anyscale Job, you will get an exact environment match to development.
In case you want to manually pull/push code or files, use:
anyscale workspace pull [--pull-git-state]
or:
anyscale workspace push [--push-git-state]
s
Note that the git repo state isn't propagated by default on push/pull since it can add high overhead. Use the --push-git-state and --pull-git-state flags to enable syncing of the git state.
In case you want to SSH to your Workspace, use:
anyscale workspace ssh
or, to port forward a specific port:
anyscale workspace ssh -- -L 8000:localhost:8000
Example
- Let's assume you already have a Workspace called "my-workspace" set up. Run:
anyscale workspace clone -n my-workspace - Go into your Workspace directory:
cd project-for-workspace-my-workspace - Make some code changes.
- Run a command:
anyscale workspace run 'python my_file.py args' - Notice that the command will be run with the latest file changes reflected in the cluster. This is because
anyscale workspace rundoes an implicit push unless you pass--no-push.
Hybrid workflow
Instead of using the run command, you can also use anyscale workspace push followed by running the desired command manually in the Web Terminal or JupyterLab terminal in the Workspace. This is a hybrid laptop centric and cloud centric workflow, where edits happen locally but command runs go in the browser.
If you made edits in the browser and want to sync the files down to your laptop again, just run anyscale workspace pull again. However, we recommend trying to keep either the browser or laptop the source of truth for the code, even if you run commands from the other.