Configure Google Cloud resources for an Anyscale cloud
Configure Google Cloud resources for an Anyscale cloud
Before you run Ray workloads on Anyscale, an organization owner must configure Google Cloud resources for an Anyscale cloud. With this integration, Anyscale manages resources such as compute instances and storage directly in a Google Cloud project.
If you deployed an Anyscale cloud resource on Google Cloud with anyscale cloud setup or anyscale cloud resource setup, you might need to run a time-sensitive update. This update ensures Anyscale can remove infrastructure from your Google Cloud account if you decide to delete your Anyscale cloud. See Update Anyscale clouds deployed with Deployment Manager.
Prerequisites
- Create a Google Cloud project for Anyscale to operate in.
- Install the Google Cloud CLI.
- Optional: Authenticate the Google Cloud CLI in the project.
1. Install the Anyscale CLI
- Run the following command to install the Anyscale CLI and Python client package:
pip install -U "anyscale[gcp]"
- To authenticate your credentials, run the following command, which fetches and updates the token that confirms your identity in the
~/.anyscale/credentials.jsonfile:
anyscale login
If necessary, log in to the Anyscale console to complete authentication.
2. Choose a resource configuration method
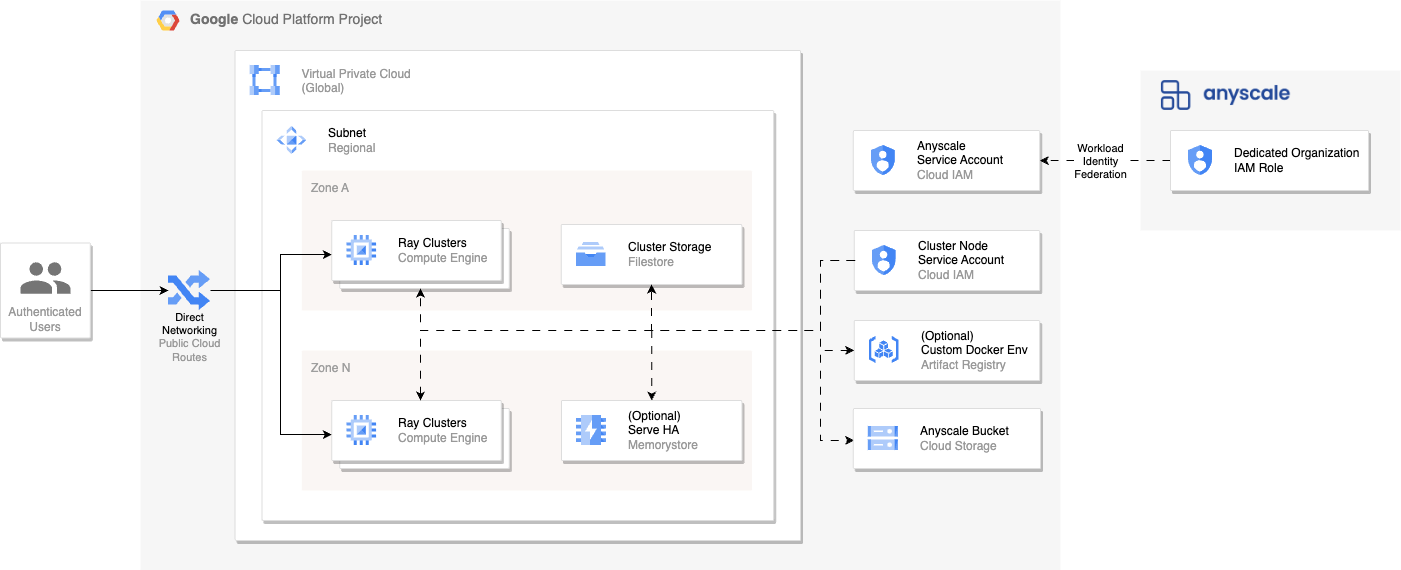
Configuring Google Cloud resources for an Anyscale cloud integrates Anyscale's capabilities into your Google Cloud project to use its compute, storage, and networking resources for scalable, distributed computing.
You can use one of two different configuration methods that use the Anyscale CLI. Choose a method based on your organization's requirements:
anyscale cloud setup- Use for rapid configuration and a straightforward, low-maintenance solution; deploy in public subnets and access over public IP addresses without setting up additional networking infrastructure.anyscale cloud register- Suited for teams with advanced cloud expertise, seeking enhanced security, custom private networking, and specific compliance needs.
3. Configure cloud resources
Based on the configuration method selected from the previous section, configure Google Cloud resources for your Anyscale cloud with the following instructions.
- anyscale cloud setup
- anyscale cloud register
When you use the anyscale cloud setup flow, Anyscale automatically creates and configures the necessary resources within your Google Cloud project. When you launch a Ray cluster, you use VMs in public subnets and access them using public IP addresses without needing to set up additional networking infrastructure such as VPNs.
Your Google Cloud organization might contain policies that deny VMs from using public IP addresses. You must use the anyscale cloud register flow and configure private networking. Consult your Google Cloud administrator if you encounter networking errors.
Step 1: Verify permissions in the Google Cloud project
Go to your role in the Google Cloud project and ensure that your user account has theiam.serviceAccounts.setIamPolicy permission enabled so that Anyscale can grant Google Cloud Deployment Manager the permission to set IAM policies.Step 2: Enable Google Cloud APIs
Enable the Cloud Resource Manager API so that Anyscale can enable all other required APIs.Step 3: Configure cloud resources
Run the following command to configure Google Cloud resources for a new cloud:
anyscale cloud setup \
--provider gcp \
--name <cloud-name> \
--region <google-cloud-region> \
--project-id <google-cloud-project-id> \
--enable-head-node-fault-tolerance
--enable-head-node-fault-tolerance: Enables head node fault tolerance in Anyscale services by configuring an additional Memorystore instance for the Ray Global Control Store. Note that this flag extends the setup time by approximately 10 minutes.
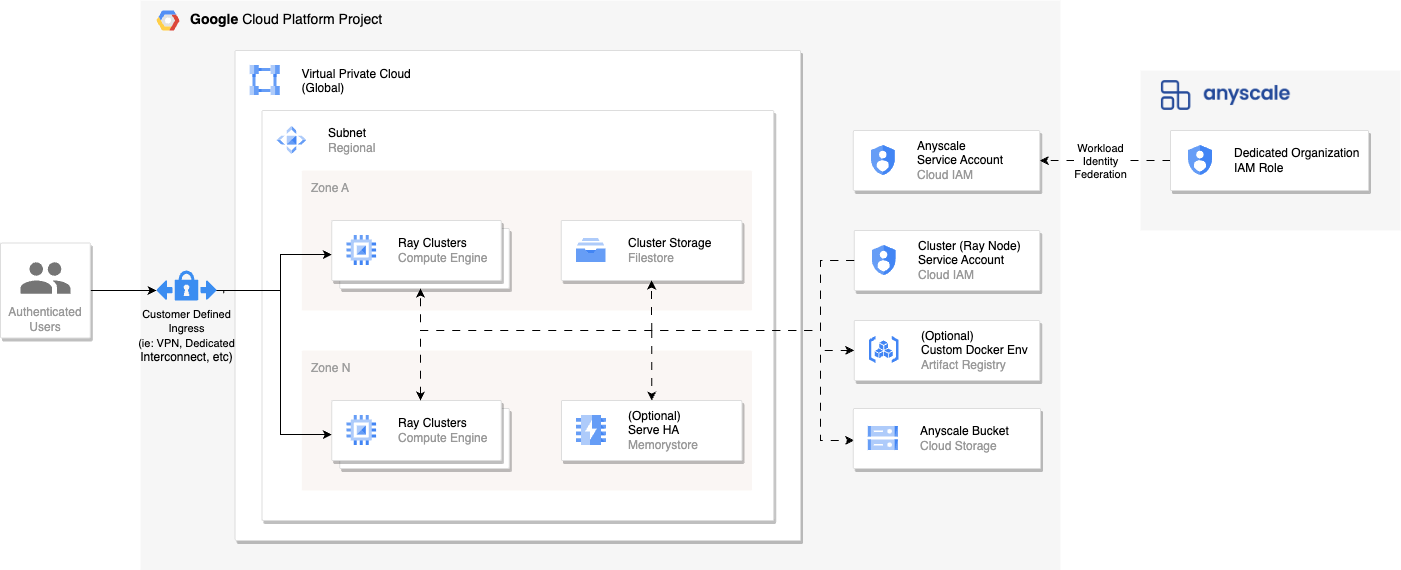
For the anyscale cloud register method, you're responsible for creating and configuring Google Cloud resources needed to integrate with Anyscale. You define subnets to deploy Ray clusters and access them using public or private IP addresses.
This custom-defined networking requires you to configure the network paths between users, clusters, and the Anyscale Control Plane. Connectivity and network performance between users and clusters depends on your setup.
Note: Due to limited support for certificates on Google Cloud internal load balancers, Anyscale services created for private network clouds are exposed over http rather than https.
Choose method for creating cloud resources
You have three methods for creating custom Google Cloud infrastructure resources to connect to Anyscale:
- (Recommended) Anyscale-provided Terraform module
- Create your own Terraform module
- Create resources manually in the Google Cloud console
Use this predefined set of configurations developed by Anyscale, which simplifies the setup process. Applying this module to your cloud environment configures the required resources in your Google Cloud project.
For details and instructions on using this module, see the following resources:
You can create custom Terraform modules to tailor cloud resources and configurations to meet compliance requirements.
You can manually create resources in the Google Cloud console, which offers maximum customization but can be prone to manual errors.
Filestore is optional for all Anyscale clouds on Google Cloud and not created by default.
Existing cloud configurations might include Filestore. When Filestore is present, Anyscale uses it for shared storage locations by default. In clouds without Filestore, Anyscale uses the default Google Cloud Storage bucket you configure during cloud setup for these shared storage locations. See Shared storage on Anyscale.
Cloud resources created in a Google Cloud project must meet a list of minimum requirements to work with Anyscale.
Following the Anyscale Terraform getting started guide satisfies these requirements by default. For all other methods, perform the following steps:
Resource requirements
Google Cloud APIs
Enable the following Google Cloud APIs in the Google Cloud project you use to host the Anyscale Cloud. See How to enable an API in your Google Cloud project.
| API Name | Service Name | Description |
|---|---|---|
| Compute Engine API | compute.googleapis.com | Manages VM instances and other Compute Engine resources. |
| Cloud Filestore API | file.googleapis.com | Manages file storage for VM instances. |
| Cloud Storage API | storage-component.googleapis.com, storage.googleapis.com | Manages object storage for storing and accessing data. |
| Certificate Manager API | certificatemanager.googleapis.com | Manages SSL/TLS certificates and related settings. |
| Deployment Manager API | deploymentmanager.googleapis.com | Manages infrastructure deployment and calls other Google APIs. |
| Cloud Resource Manager API | cloudresourcemanager.googleapis.com | Manages Google Cloud resources like projects, folders, etc. |
| Service Usage API | serviceusage.googleapis.com | Manages Google Cloud service usage. |
| Cloud Memorystore for Redis API | redis.googleapis.com | Manages in-memory data store services on Google Cloud. Optional for enabling head node fault tolerance in services. |
Service accounts
Anyscale uses this to manage GCE instances and Ray clusters in your Google Cloud project.
- The service account must be the
owneroreditorrole on the project. - The principal must be the
Service Account Token Creatorrole on the service account itself.
This is the default account attached to Ray clusters, modifiable for specific workload needs.
- The service account must have read, write, and list permissions on the cloud storage bucket. The broadest way to grant permissions implicitly is to assign the
Storage Adminrole to both service accounts in the bucket policy. - To use custom docker environments, the service account must have the
Artifact Registry Readerrole.
Workload identity federation
- Navigate to IAM & Admin in Google Cloud and select Workload Identity Pools.
- Create a pool, name it, and note down the name.
- Within the identity pool, create a new provider.
- Choose AWS as the external identity provider.
- Input Anyscale's control plane AWS account number as the
AWS account ID. You can obtain this number from Anyscale support.
- Within the workload identity provider, add the following mappings:
- Add an attribute condition to restrict access to an organization-specific AWS IAM role in Anyscale's AWS account. Find your organization ID on the admin page.
{
  "google.subject": "assertion.arn",
  "attribute.aws_role": "assertion.arn.contains('assumed-role') ? assertion.arn.extract('{account_arn}assumed-role/') + 'assumed-role/' + assertion.arn.extract('assumed-role/{role_name}/') : assertion.arn",
  "attribute.arn": "assertion.arn"
},
google.subject.startsWith("arn:aws:sts::<Anyscale AWS #>:assumed-role/gcp_if_<Organization ID>")
- In IAM & Admin, navigate to Service Accounts.
- Select the Anyscale Access service account.
- Add an IAM binding with the role to the access service account:
{
  "role": "roles/iam.workloadIdentityUser",
  "members": [
    "principalSet://iam.googleapis.com/projects/<PROJECT_NUMBER>/locations/global/workloadIdentityPools/<POOL_NAME>/attribute.role_name/arn:aws:sts::<Anyscale AWS #>:assumed-role/gcp_if_<Organization ID>"
  ]
}
VPC and subnets
- Go to the VPC network section in the Google Cloud console.
- Select either custom or auto mode for your VPC creation.
- Anyscale requires exactly one subnet to launch instances.
- Create a subnet within your VPC.
- Ensure the subnet CIDR range is at least /24. A range of /20 or greater is preferable.
- For valid Google Cloud IPv4 ranges, see the Google Cloud documentation.
- By default, subnets are public with a route to the internet.
- For a private subnet, use the
--private-networkflag in the cloud registry for Customer Defined Resources.
- If you plan to use Anyscale services on a private network, create a proxy-only subnet.
- This subnet must be in the same region as your cloud.
Firewall policy
- Allow all ingress TCP traffic on port 443 (can be restricted to your CIDR blocks) for access to Ray jobs, Grafana dashboard, web-based workspaces, and VS Code Desktop connections.
- Allow all ingress traffic from the given VPC to enable intra-cluster communication.
- Allow all egress traffic for reporting back to users and the Anyscale control plane.
Cloud Storage bucket
- Create a Google Cloud Storage bucket for persisting artifacts (logs, checkpoints, etc.).
- The bucket must be accessible by both service accounts created above.
- Grant the
Storage Adminrole to both service accounts in the bucket policy.
Filestore (Optional)
- Create a Filestore instance if you need shared file storage across cluster nodes.
- The instance should be in the same region as your VPC.
- Grant access from your VPC's network.
Memorystore (Optional - for head node fault tolerance)
To enable head node fault tolerance, create a Memorystore Redis cluster with:
- At least 5 GiB of memory.
- High availability with replicas enabled.
- Authorization mode set to appropriate authentication.
- Network access from your VPC.
Register the Anyscale cloud
After setting up the necessary resources, use the following command to register your Anyscale cloud on Google Cloud:
anyscale cloud register \
--provider gcp \
--name my-gcp-cloud \
--project-id <google-cloud-project-id> \
--vpc-name <vpc-name> \
--subnet-name <subnet-name> \
--region <google-cloud-region> \
--anyscale-access-service-account-email <anyscale-access-sa>@<project>.iam.gserviceaccount.com \
--instance-service-account-email <ray-cluster-sa>@<project>.iam.gserviceaccount.com \
--provider-name projects/<project-number>/locations/global/workloadIdentityPools/<pool-id>/providers/<provider-id> \
--cloud-storage-bucket-name gs://<bucket-name> \
--filestore-instance-id <filestore-instance> \ # Optional
--filestore-location <filestore-location> \ # Optional if using Filestore
--memorystore-instance-id <memorystore-name> \ # Optional for fault tolerance
--private-network \ # Optional for private networking
--functional-verify workspace # Optional to test the cloud
--memorystore-instance-id: Enables head node fault tolerance in Anyscale services.
--private-network: Enables private networking on private subnets and IP addresses.
--functional-verify workspace: Launches a test workspace to verify validity of resources.
--functional-verify service: Launches a test service to verify validity of resources.
4. Verify cloud resources
Anyscale provides a CLI command to verify cloud resources for both configuration methods. Anyscale runs verification automatically during cloud creation and you can also run the verification on demand.
Trigger functional verification by specifying --functional-verify workspace or --functional-verify service.
Anyscale launches a workspace or a service to verify that the cloud is functional.
anyscale cloud verify --name my-gcp-cloud
The following output displays:
Authenticating
Loaded Anyscale authentication token from ANYSCALE_CLI_TOKEN.

Output
(anyscale +0.3s) Verifying APIs enabled for project...
(anyscale +0.6s) All required APIs are enabled.
(anyscale +0.6s) Verifying service accounts...
(anyscale +1.2s) Service accounts verification succeeded.
(anyscale +1.2s) Verifying VPC and subnets...
(anyscale +1.5s) VPC and subnet verification succeeded.
(anyscale +1.5s) Verifying firewall rules...
(anyscale +1.8s) Firewall rules verification succeeded.
(anyscale +1.8s) Verifying Cloud Storage bucket...
(anyscale +2.0s) Cloud Storage bucket verification succeeded.
(anyscale +2.0s) Verifying Filestore...
(anyscale +2.2s) Filestore verification succeeded.
(anyscale +2.2s) Start functional verification...
Functional verification for WORKSPACE is about to begin.
It will spin up one n1-standard-4 instance and will incur a small amount of cost.
For workspace verification, it takes about 5 minutes.
The instances will be terminated after verification. Do you want to continue? [y/N]: y
╭──────────────────────────────────────────── workspace verification ────────────────────────────────────────────╮
│ 0:00:02 Workspace created at https://console.anyscale.com/workspaces/expwrk_xyz/ses_xyz                        │
│ 0:01:45 Workspace is active.                                                                                   │
│ 0:00:00 Workspace termination initiated.                                                                       │
╰─────────────────────────────────────────────────────────────────────────────────────────────────────────────────╯
0:01:47 ━━━━━━━━━━━━━━━━━━━━━━━━━━━━━━━━━━━━━━━━ Workspace verification succeeded!
Manage cloud resources
Update a cloud setup cloud
If you configured your cloud using anyscale cloud setup, you can update certain cloud features. For example, the following command enables head node fault tolerance:
anyscale cloud update --name <cloud-name> --enable-head-node-fault-tolerance
Update a customer-registered cloud
If you configured your cloud using anyscale cloud register, you can update resource configurations with a YAML file. This workflow exports your current cloud configuration, lets you modify it, and applies the changes.
To update resources for a customer-registered cloud, do the following:
-
Export the current cloud configuration to a YAML file:
anyscale cloud get --name <cloud-name> --output cloud-resources.yaml -
Open the file and edit the resource settings you want to change, such as adding subnets or updating firewall rules. For example, add
memorystore_instance_nameundergcp_configto enable head node fault tolerance. See Configure head node fault tolerance. Save the file. -
Apply the updated configuration:
anyscale cloud update --name <cloud-name> --resources-file cloud-resources.yaml
The anyscale cloud update command requires the same Google Cloud IAM permissions as anyscale cloud verify.
The --resources-file flag only updates existing resources in the cloud configuration. To add or remove resources entirely, use anyscale cloud resource create or anyscale cloud resource delete. See Configure multiple resources for an Anyscale cloud.
Delete cloud resources
To delete an Anyscale cloud and optionally its associated Google Cloud resources:
anyscale cloud delete --name <cloud-name>
For clouds created with anyscale cloud setup, this command uses Google Cloud Deployment Manager to delete all resources created by Anyscale, including:
- VPC and subnets
- Firewall rules
- Service accounts
- Cloud Storage buckets (and all data within them)
- Filestore instances
- Memorystore instances
For clouds registered with anyscale cloud register, this command only removes the cloud from Anyscale but doesn't delete any Google Cloud resources. You must manually delete Google Cloud resources or use your Terraform scripts.
Glossary of cloud resources
| Resource | Description |
|---|---|
| Virtual Private Cloud (VPC) | A virtual network within your Google Cloud project. Anyscale deploys each Cloud in its own VPC, providing logical isolation from others. |
| Subnets | Ranges of IP addresses within your VPC. Google Cloud resources such as GCE VM instances are attached to these subnets. Anyscale deploys workloads within these defined VPCs and subnets. |
| Firewall rules | Collections of firewall rules that secure the cloud environment by controlling incoming and outgoing traffic to Google Cloud resources. Anyscale requires specific firewall rules to enable access to its suite of components and applications. |
| Service accounts | Identity and access management accounts that allow Anyscale to manage resources in your Google Cloud project. Includes both the Anyscale Access service account (for control plane operations) and the Ray Cluster service account (attached to cluster nodes). |
| Cloud Storage bucket | Google Cloud Storage provides object storage to store cluster logs, workspace snapshots, Ray checkpoints, and other artifacts. Anyscale-created clusters always have access to this bucket. |
| Filestore (Optional) | Google Cloud Filestore provides managed file storage for use with GCE instances. When present, Anyscale uses Filestore for shared storage between cluster nodes. |
| Memorystore (Optional) | Google Cloud Memorystore for Redis provides a Redis-compatible in-memory database service used for head node fault tolerance in Anyscale services. |
| Workload Identity Federation | The Anyscale control plane authenticates and manages resources in your Google Cloud project without using long-lived service account keys. |
Next steps
- Configure IAM mapping to set different permissions for different users or projects
- Access Cloud Storage buckets from your Ray applications
- Use custom container images for your workloads
- Get started with workspaces to begin developing
Update Anyscale clouds deployed with Deployment Manager
Google Cloud is retiring Deployment Manager on June 30, 2026. All new Anyscale cloud resources created on Google Cloud using anyscale cloud setup or anyscale cloud resource setup now use Infrastructure Manager. Existing Anyscale clouds might have used Deployment Manager.
Anyscale clouds deployed with Deployment Manager will continue to operate normally after June 30, 2026, but Anyscale can no longer use Deployment Manager to delete resources in your Google Cloud account after that date. This means that when you run anyscale cloud delete, Anyscale might not delete some resources it created in your account.
Anyscale provides the following CLI method to update your cloud resource to use Infrastructure Manager. This operation doesn't interrupt ongoing workloads. If your cloud already uses Infrastructure Manager, the command has no impact.
You must fulfill the following requirements:
- Anyscale CLI version 0.26.90 or later.
- You must be an Anyscale organization owner.
- This command requires the same Google Cloud IAM permissions as running
anyscale cloud setup, which include creating service accounts. Make sure you have Google Cloud credentials in the session where you run the Anyscale CLI.
Run the following command to update your Anyscale cloud:
anyscale cloud update --name <cloud_name> --migrate-dm-to-im
If you have unused Anyscale clouds backed by Google Cloud VMs, Anyscale recommends deleting those clouds before June 30, 2026.