Compute configuration options for Google Cloud
Compute configuration options for Google Cloud
This page lists common cloud-specific compute configurations for Anyscale clouds deployed on Google Cloud. You specify these options using the Instance config field in the Anyscale console at the node or cluster level.
When you configure settings with the Instance config field for a worker group, those settings fully replace the Instance config field at the cluster level for that group.
If your workload uses a machine pool, Anyscale merges your Instance config on top of the launch template defaults rather than fully replacing them. Some fields deep-merge by identity key. See Override machine pool defaults from a compute config.
Use cluster-level advanced_instance_config for settings that apply to all nodes, such as disk size, service accounts, and network interfaces. Use worker-group-level advanced_instance_config for settings specific to a worker group, such as reservation affinity.
For a general overview of compute configs, see Compute configuration on Anyscale.
For configuration settings applicable to all Anyscale clouds, see Advanced settings for compute configs on Anyscale.
For a complete reference of configurable fields, see the Google Cloud docs or contact Anyscale support.
Anyscale doesn't support setting the following fields:
count
minCount
namePattern
instanceProperties
  machineType
  metadata
    items
      user-data
  disks
    initializeParams
      sourceImage
Manage capacity reservations
Google Cloud capacity reservations guarantee node availability for your workloads. On Google Cloud, several instance families such A3 (H100 GPUs), A4 (B200 GPUs), or H4D (HPC-optimized) use a reservation-bound provisioning model for capacity reservations. To configure capacity reservations for a specific worker node type, modify the advanced configuration through the console UI or by editing the compute config YAML file.
Before configuring a capacity reservation in Anyscale, create the Google Cloud reservation as a specific reservation. The Anyscale compute config targets reservations with consumeReservationType: SPECIFIC_RESERVATION, which requires specificReservationRequired: true on the Google Cloud reservation. To set this property, select Select specific reservation in the Google Cloud console when creating the reservation, or pass --require-specific-reservation to gcloud compute reservations create. You can't change this property after the reservation is created. If an existing reservation doesn't have it set, delete and recreate the reservation.
Set the zones field in your compute config to match the reservation's zone exactly. Reservation-bound instances are zone-specific, and a mismatch causes instance creation to fail with a 400 error.
Use the fully qualified Google Cloud resource path for the reservation values field, in the format projects/<project-id>/reservations/<reservation-name>. This avoids ambiguity when your Anyscale cloud spans multiple Google Cloud projects.
To configure a capacity reservation in the console UI, navigate to a worker node and expand the Advanced config section. Under the Instance config tab, input the following JSON:
{
  "instanceProperties": {
    "reservationAffinity": {
      "consumeReservationType": "SPECIFIC_RESERVATION",
      "key": "compute.googleapis.com/reservation-name",
      "values": ["projects/<project-id>/reservations/<reservation-name>"]
    },
    "scheduling": {
      "provisioningModel": "RESERVATION_BOUND"
    }
  }
}
The following YAML shows a compute config for a capacity reservation using the CLI or SDK:
cloud: <cloud-name>
worker_nodes:
  - instance_type: a3-highgpu-8g
    min_nodes: 1
    max_nodes: 1
    market_type: ON_DEMAND
    advanced_instance_config:
      instanceProperties:
        reservationAffinity:
          consumeReservationType: SPECIFIC_RESERVATION
          key: compute.googleapis.com/reservation-name
          values:
            - projects/<project-id>/reservations/<reservation-name>
        scheduling:
          provisioningModel: RESERVATION_BOUND
zones:
  - us-central1-a
Most CPU-only instance types don't require reservation-bound provisioning. For standard CPU reservations, omit the scheduling block and use only the reservationAffinity configuration.
For a complete list of instance families that require reservation-bound provisioning, see Create a reservation-bound VM. For more details on consuming reservations, see the Google Cloud reservations documentation.
Change the default disk size
The default disk size for all nodes in an Anyscale cluster is 150 GB. You can change the default disk size for the entire cluster or an individual worker node type.
To modify the default disk size from the console UI, use the Advanced configuration section for the worker node or the Advanced settings section for the entire cluster. The following example increases the default to 500 GB.
{
  "instance_properties": {
    "disks": [
      {
        "boot": true,
        "auto_delete": true,
        "initialize_params": {
          "disk_size_gb": 500
        }
      }
    ]
  }
}
The following sample YAML modifies the disk for all nodes in the Anyscale cluster:
cloud: <cloud-name>
head_node:
  instance_type: <head-instance-type>
worker_nodes:
  - instance_type: <worker-instance-type>
    min_nodes: <min-nodes>
    max_nodes: <max-nodes>
advanced_instance_config:
  instanceProperties:
    disks:
      - boot: true
        auto_delete: true
        initialize_params:
          disk_size_gb: 500
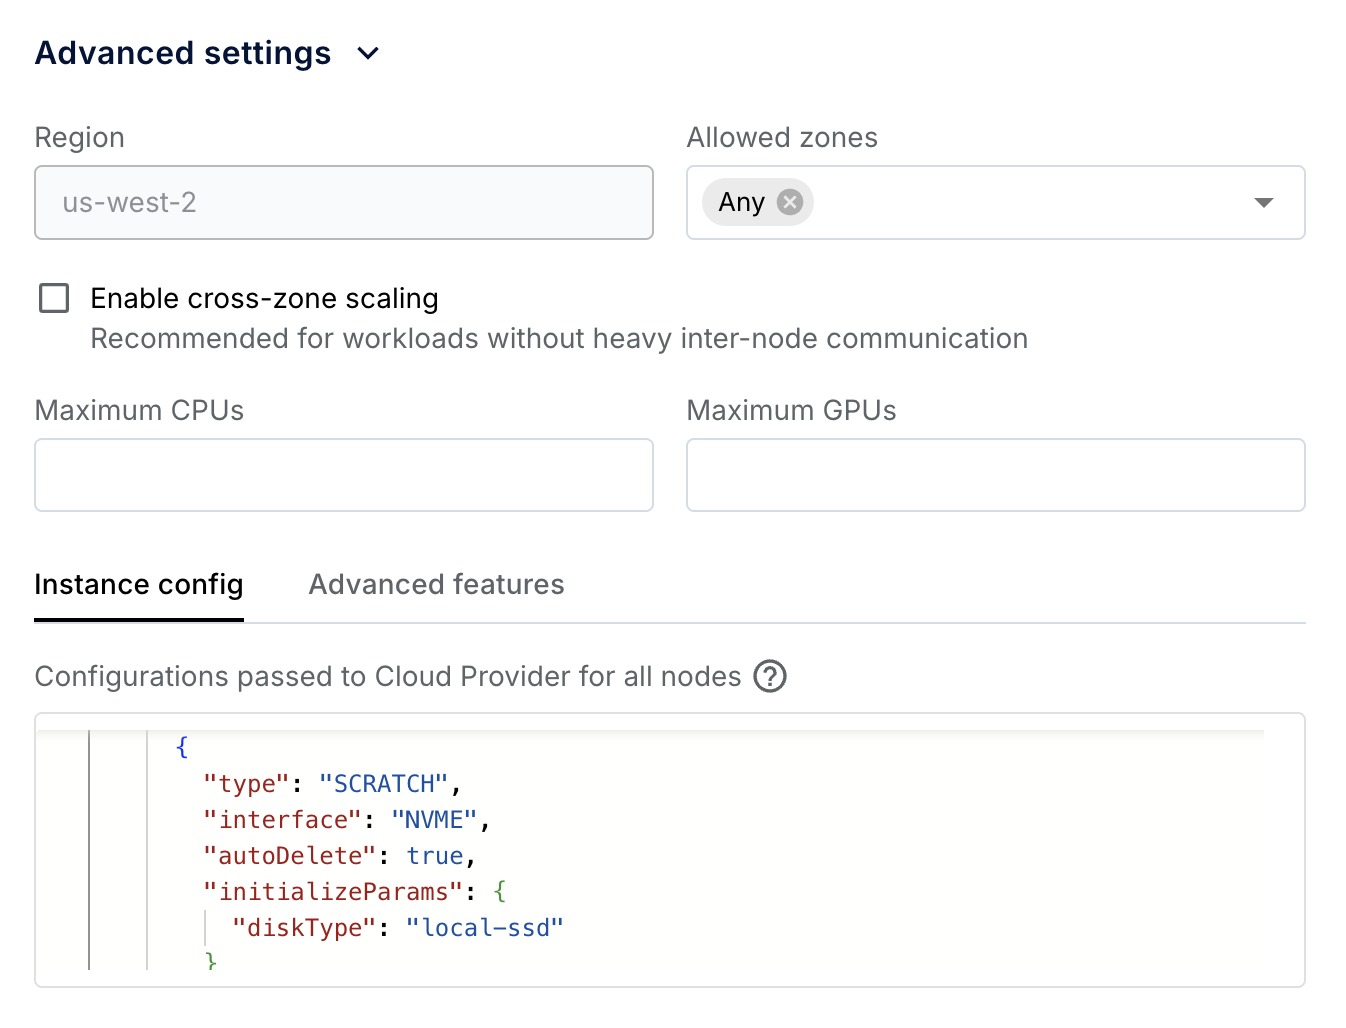
NVMe configuration
Anyscale supports the Non-Volatile Memory Express (NVMe) interface for accessing SSD storage volumes, which adds temporary storage to instances. Anyscale exposes /mnt/local_storage as the mount path in the Ray container by default. For instance types without NVMe, /mnt/local_storage falls back to the root disk.
Specify the number of NVMe devices to attach to the instance in the Advanced settings > Instance config section of the compute config. Each local SSD has 375 GB. See the Google Cloud local SSD documentation for more details.
{
  "instance_properties": {
    "disks": [
      {
        "boot": true,
        "type": "PERSISTENT",
        "initializeParams": {
          "diskSizeGb": 150
        }
      },
      {
        "type": "SCRATCH",
        "interface": "NVME",
        "autoDelete": true,
        "initializeParams": {
          "diskType": "local-ssd"
        }
      },
      {
        "type": "SCRATCH",
        "interface": "NVME",
        "autoDelete": true,
        "initializeParams": {
          "diskType": "local-ssd"
        }
      }
    ]
  }
}
Subnets and service accounts
Specify the following configurations for the entire cluster (don't specify them for individual node groups unless you have to):
- Subnets:
- Any subnet registered with the cloud.
- Service accounts:
- Any service account for the cluster to run with. It must have permissions specified for a Ray cluster service account in the cloud deployment documentation.
To modify them from the console UI, use the Advanced settings section for the entire cluster.
{
  "instance_properties": {
    "service_accounts": [
      {
        "email": "<service-account-email>",
        "scopes": [
          "https://www.googleapis.com/auth/cloud-platform"
        ]
      }
    ],
    "network_interfaces": [
      {
        "subnetwork": "<subnet-url>",
        "access_configs": [
          {
            "type": "ONE_TO_ONE_NAT"
          }
        ]
      }
    ]
  }
}
The following sample YAML modifies the service account and subnets for all nodes in the Anyscale cluster:
cloud: <cloud-name>
head_node:
  instance_type: <head-instance-type>
worker_nodes:
  - instance_type: <worker-instance-type>
    min_nodes: <min-nodes>
    max_nodes: <max-nodes>
advanced_instance_config:
  instance_properties:
    service_accounts:
      - email: <service-account-email>
        scopes:
          - "https://www.googleapis.com/auth/cloud-platform"
    network_interfaces:
      - subnetwork: <subnet-url>
        access_configs:
          - type: ONE_TO_ONE_NAT